Sunday, September 11, 2016

Managing Links and Embedded Graphics

When you Place a graphic, its original file is not embedded into the document. Instead, InDesign adds a screen-resolution version of the file to the layout, so that you can view and position the graphic, and creates a link, or file path, to the original file on disk. When you export or print, InDesign uses the links to retrieve the original graphics, creating the final output from the full resolution of the originals.


Links can help minimize the size of a document by storing graphics outside the document file. After placing a graphic, you can use it many times without significantly increasing the size of the document; you can also update all links at once.


If the bitmap image you place is 48K or smaller, InDesign automatically embeds the full-resolution image, instead of the screen-resolution version in your layout. InDesign displays these images in the Links panel, so that you can control versions and update the file whenever you like; however, the link is not necessary for optimal output.


Note: If you move a document to another folder or disk (for example, if you take it to a service provider), be sure you also move the linked graphics files; they are not stored inside the document. You can copy all related files automatically, using the Preflight and Package features. (See the Further Reading section below: Performing a preflight check, and Packaging files.)


Links panel overview


All files placed in a document are listed in the Links panel. This includes both local (on disk) files and assets that are managed on a server. However, files that are pasted from a website in Internet Explorer do not display in this panel.


Links panel
A. Category columns B. Show/Hide Link Information C. One or more instances modified icon D. Modified icon E. Missing-link icon F. Embedded-link icon
A linked file can appear in the Links panel in any of the following ways:


Up-to-date An up-to-date file displays only the file’s name and its page in the document.
Modified This icon means that the version of the file on disk is more recent than the version in your document. For example, this icon will appear if you import a Photoshop graphic into InDesign, and then another artist edits and saves the original graphic in Photoshop.

Missing
The graphic is no longer in the location from which it was imported, although it may still exist somewhere. This can happen if someone moves the original file to a different folder or server after it’s been imported into an InDesign document. You can’t know whether a missing file is up to date until its original is located. If you print or export a document when this icon is displayed, the file may not print or export at full resolution.

Embedded
Embedding the contents of a linked file suspends management operations for that link. If the selected link is currently in an “edit in place” operation, this option is not enabled. Unembedding the file restores management operations to the link.

For a video tutorial on using the Links panel, see www.adobe.com/go/lrvid4027_id.

InDesign Secrets provides a videocast on Links panel tips and techniques at Saving time with the Links panel.


Use the Links panel


  • To display the Links panel, Choose Window > Links. Each linked file and automatically embedded file is identified by name.
  • To select and view a linked graphic, select a link in the Links panel and then click the Go To Link button , or choose Go To Link in the Links panel menu. InDesign centers the display around the selected graphic.
  • To sort links in the panel, choose Sort By Status, Sort By Name, Sort By Page, or Sort By Type in the Links panel menu or the context menu.


Placing a graphic


The Place command is used most often, and it's the recommended way to import a graphic. You can also import a graphic from your desktop, or from any removable media, by using drag-and-drop or copy-and-paste. The drag-and-drop method works like the Place command, with images appearing in the Links panel after they're imported; however, you cannot set import options for the files you drag and drop. (See InDesign Help: Alternate methods for importing graphics.)
Note: If you place or drag and drop a graphic from a removable medium, such as a CD-ROM, the link will break when you remove that medium from your system.


To import a graphic by placing it:


1. Do one of the following:
  1. To import a graphic without first creating a frame, make sure that nothing in the document is selected.
  2. To import a graphic into an existing frame, select the frame.
  3. To replace an existing image, select the graphics frame.
2. Choose File > Place and select a graphics file.
3. If you want to view the graphics file before importing, select Preview.
4. If you want to replace the selected object, select Replace Selected Item.
5. If you want to set format-specific import options, do one of the following:
  1. Select Show Import Options to see format-specific settings, and then click Open (Windows) or Choose (Mac OS).
  2. Hold down Shift as you click Open/Choose or Shift-double-click a filename.
6. If another dialog box appears, select your import options, and click OK. (See IndDesign Help: Understanding graphics formats and their options.)
7. Do one of the following:
  1. To import into a new frame, click the loaded graphics icon in the layout at the place where you want the upper left corner of the graphic to appear.
  2. To import into an existing unselected frame, click the loaded graphics icon anywhere in that frame.
  3. To import into an existing selected frame, you don't need to do anything; the image automatically appears in that frame.
If you accidently replace an existing graphic with an image you're placing, you can undo the placement by pressing Ctrl+Z (Windows) or Command+Z (Mac OS) to return the original image to the frame, and display the loaded graphics icon.


Alternate methods for importing graphics


The Place command is the primary method of importing, because it provides the highest level of support for resolution, file formats, and color, via the impaort options included with most file types. If you're creating a document where those characteristics aren't critical, you can copy and paste or drag-and-drop to import graphics into InDesign. When you use these methods to transfer a graphic into an InDesign document, some attributes of the original object may be lost, depending on the limitations of the operating system and the range of data types the other application makes available for transfer.


Copying and pasting or dragging and dropping between two InDesign documents, or within a single document, preserves all of the graphics attributes that were imported or applied. For example, if you copy a graphic from one InDesign document and paste it into another, the new copy will be an exact duplicate of the original, even including the original's link information, so that you can update graphic when the file on disk changes. (See Managing links and embedded graphics in Adobe InDesign Help.)


When copying and pasting a graphic from another document into an InDesign document, InDesign does not create a link to the graphic in the Links panel. The graphic may be converted by the system clipboard during the transfer, so both image quality and print quality may be lower in InDesign than in the graphic's original application.


Saturday, September 10, 2016

Save an InDesign CC File to CS6 (Save Backwards to an Earlier InDesign Version)

If you are working in InDesign CC and want to be able to open your document in CS6 (or earlier), you need to export an IDML file.

In the newer software, e.g. InDesign CC, export (File > Export) the document to the InDesign Markup Language (IDML):


Then open the IDML file in the older software (e.g., InDesign CS6 or CS5). It will convert it to an untitled InDesign document.  

Saving a document in a previous version of InDesign is also referred to as “saving down.” Content created using features specific to the later version of InDesign may be modified or omitted when you open the document in a previous version of InDesign.

The current IDML format replaces the Interchange (INX) format used for saving backwards in previous versions (CS4 and earlier).

To open the InDesign CS5 document in InDesign CS3, open the exported IDML file in InDesign CS4, save it and export it to InDesign CS3 Interchange (INX), and then open the exported INX file in InDesign CS3. 

You might need to make sure that the computer running the previous version of InDesign is updated with the appropriate plug-ins so that it can open the exported IDML file. The person running InDesign CS4 can obtain the compatibility plug-ins by choosing Help > Updates and following the prompts. Plug-ins can also be installed from the Adobe website: Visit Product updates page on the Adobe website, and choose to the InDesign from the product list. 


Read more about saving backwards in InDesign here: http://forums.adobe.com/docs/DOC-1024


Friday, September 9, 2016

Making a Layout: The Elements and Principles of Design

The foundation of any design is governed by underlying principles and executed with basic elements. They can be applied in a number of ways and combinations that can be confusing when first put into practice. But remember that with practice comes proficiency. Keep these elements and principles in mind as you design.

The Basic Elements of Design*

The basic elements of design are like building blocks or the ingredients of a recipe. They must be used in the proper combination and proportion to work. A layout may use some but not necessarily all these elements.
Line - Any mark connecting any two points. It could be a graphic line, or a string of text, straight or squiggly, roughly hand drawn or precisely rendered.

Shape - Anything that has height and width. Graphic elements, blocks of text, photographs.

Texture - The look or feel of a surface. Texture can be the appearance of silky fabric or rough tree bark in a photograph, or created by text on a page.

Space - The distance or area between or around things. Does it "feel airy" and "breathing room" or is it crowded? Space can be positive (an area that is occupied by an object) or negative (space that is not occupied by an object, such as the white areas on this web page).

Size (Scale) - How big or small something is. Do the objects in the layout have contrasting or similar sizes?

Value (Contrast) - The darkness or lightness of an area or object. Contrast is the difference of value between two or more objects. Black has a dark value, yellow has a light value. Too much text and crowded graphics give a layout an overall dark value.

Color (Hue, Chroma)- Color can convey emotion or mood, highlight important items (emphasis) or create unity.

The Principles of Design*

Once you understand the basics, put them together using the recipe dictated by design principles. A good layout will have all these principles taken into consideration.

Balance - The distribution of elements and space; equilibrium. " It is the arrangement of the objects in a given design as it relates to their visual weight within a composition." [1] Balance can be symmetrical or asymmetrical. Symmetrical layouts have inherent formality, while asymmetrical layouts can seem informal. Unbalanced layouts (used with care) can be used to create emphasis.

Rhythm (Repetition) - Rhythm is the repetition of elements to create the effect of movement, a pattern or texture from text, typefaces, shapes, size, colors.

Emphasis - Emphasis is created by the comparison of the relative size or proximity of elements in the layout. It is what is noticed first, what stands out in the layout. The dominant and subordinate elements create a hierarchy of the elements in the layout. Color and value can also imply emphasis.

Unity - Unity is the sense that all the elements in the layout look like they belong together. " … the aspects of a given design that are necessary to tie the composition together, to give it a sense of wholeness, or to break it apart and give it a sense of variety." [1] What holds it all together? What's the "glue?" Elements that have similarity or harmony can create a sense of unity.

Some more thoughts

Organization is also important to a successful layout. Create a hierarchy of information by arranging your information logically: Emphasize what is important, then in decreasing the emphasis in order of importance. Catch and hold the reader's attention with headlines and graphics, keep them reading with well-written copy and pleasing design.

For our purposes, placement on the page can indicate the importance of text or a graphic [2]:

1. Upper Left.
Position of highest prominence, emphasis or importance
2. Upper Right.
Second most prominent
2. Lower Left
Second most prominent, equal in importance to Upper Right
3. Lower Right
Least important

How a reader looks at your layout is almost as important as what they read. English-speakers are taught to read from top to bottom, left to right and generally that's how the reader's eyes will travel across a page. You can also direct the way they view the page by the pictures you use and how they are arranged. Some pictures are natural "pointers" such as a person's profile. The reader will naturally look in the direction that the photo is "looking." The composition of photos and graphics also lend themselves to "pointing."

Consider the way your eye travels across the page. You read from left to right, and a harmonious layout will keep with that flow. If you wish to shock the reader, work contrary to their expectations.

The next time you look at a magazine cover or poster or... well...anything... make a note of how you look at it.

Keep your audience in mind while designing and writing your layout. Are they twelve-year-olds? Do you think they'll have at least a high school education? Are they retired Republicans or young Democrats? Different groups of people have different expectations and assumptions of what they read.

Make it easy for your reader to get your message. Use the K.I.S.S. strategy: "Keep it Sweet and Simple." If something looks difficult to read, the reader will probably pass it over for something that appears easy to read.

*More reading

There are many systems of Design. We have arbitrarily chosen the one above for this course, for which you are responsible. A quick Google search will turn up dozens, such as these:

https://en.wikipedia.org/wiki/Design_elements_and_principles
https://creativemarket.com/blog/2013/12/02/10-basic-elements-of-design
Google image search

Notes

[1]http://www.digital-web.com/articles/principles_of_design/, site no longer live
[2] This is true for cultures that write top-to-bottom and left-to-right. Cultures that read and write in a different order (Chinese or Hebrew, for example) will have different organizational systems. 

Examples of Layout and Color


The bold sweeping lines lead the reader's eye from top left to bottom right, while the bright yellow color gets the reader's attention and draws it to the text. Blue and yellow are primary colors; yellow and orange are analogous; blue and orange are complementary.


Interesting triangular shapes combine with primary colors: red, yellow, blue.


Analogous and warm colors: yellow and red. The mug's cool color is a refreshing contrast to the rest of the layout. And, best of all, text on a path!


Analogous and cool colors: Blue, green and purple. How tranquil. The warm (yellow-gold) teddy bear stands out -- contrasts -- with the cool colors in the rest of the layout.


Analogous colors: green, blue and yellow.


Analogous colors: blue and yellow. Similar value create a sense of harmony and peace.


Red, pink (a tint of red), blue and green are the dominant colors in this layout. Red/pink is complementary to the green background.White is neutral and provides a contrasting value to the dark blue.


Purple eggs? Complements those yellow yolks.


Complementary colors in nature: red and green. Elegant, organic shapes.


Primary colors: red, yellow, blue. Great curvy shapes bracket the main images.


Similar rectangular shapes and primary colors (yellow and blue) create a bold and energetic layout.


The sweeping line across the page creates a dynamic division between negative and positive space.


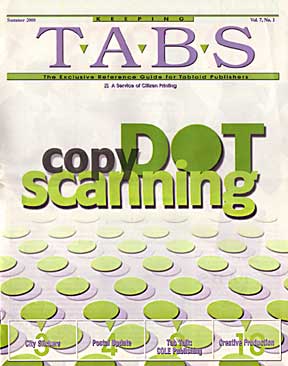
Purple and green are secondary colors and are also analogous. Rhythm is created by the repeated shapes (circles or dots) as they appear to "march" up the page to the headline while the triangles interspersed in the word "TABS" point down to it. The "O" in "DOT" repeats the circle theme.


Wow! These colors are saturated! Products in repeated (rhythmic) compartments of similar shapes unify the layout.


Color which is in counter to the reader's expectations can be a great attention-getter. Yellow star and type is complementary to the purple catsup bottle. Take note of the text wrap on either side of the bottle and the shapes created by both bottle and blocks of text.


This layout illustrates the use of repeated shapes and colors to unify the design through similarity and rhythm.


Repeated hand shapes frame the title of this piece. There is a strong contrast between the values of the dark background and light text purple hand. Purple and green are secondary and analogous colors.


Strong red lines surround a human figure, echoed in the repeated human figures below. The warm colors (red lines) and cool colors (blue background and dancers) and light and dark values create contrast.


Blue and orange --- complementary colors --- create a vibratory effect. Roof tiles create a strong lines. Repeated bird images create rhythm with a twist: three at the bottom look right, but the one at the top looks left.


Tuesday, September 6, 2016

Wrapping Text Around Graphics

You can make text wrap around any frame, including text frames. When you apply a text wrap to an object, InDesign creates a boundary around the object that repels text.

1. Choose Object > Text Wrap to display the Text Wrap palette.

2. Using the selection tool (black arrow) or direct-selection tool (white arrow), select a frame.

3. In the Text Wrap palette, click the button for the desired wrap shape:
  • Wrap Around Bounding Box creates a rectangular wrap whose width and height are determined by the bounding box of the selected object.
  • Wrap Around Object Shape also known as contour wrapping, creates a text wrap boundary that is the same shape as the frame you've selected (plus or minus any offset distances; see the next step).
  • Jump Object keeps text from appearing in any available space to the right or left of the frame in the column containing the frame.
  • Jump to Next Column forces the next paragraph to the top of the next text column or text frame.
4. For the wrap offset values, enter offset distances. Positive values move the wrap away from the edges of the frame; negative values position the wrap boundary inside the respective edges of the frame.

To apply text wrap to items on a master page, hold down Ctrl+Shift (Windows) or Command+Shift (Mac OS) and click the item on the document page. With the image selected on the document page, apply text wrap.

—CS3 for Dummies, InDesign Ch. 5, Merging Text and Graphics, pgs. 160-163

Type on a Path

Type can also be set along a path – be it a curvy path or a polygon, or open or closed path. Draw a path, then click and hold on the Text Tool to get more options. Select the T that's kicked over on its side (Text on Path Tool).


Click on the path with that tool, and type in your text. The text follows the path! What excitement!

To move the type around on the path, click on it with the Selection Tool. Notice the "I-Beam" at the origin point of the text (if the text is set centered, it's in the center of the text; if set justified left or right, it will be at the left or right of the text). Click on the I-Beam with the Selection Tool and drag it to where you want it. If you drag it to the opposite side of the path, it will flip upsidedown.

Align type centered or on the left or right margin using the paragraph palette or control panel.

Tip: If you align the "I-Beam" with the center handle of the bounding box and align text centered using the paragraph palette, your text will center automatically and perfectly.


Typesetting Style Guidelines

Your typesetting will look professional when you follow these style guidelines.
Use only one space between sentences (double spacing is only for those dinosaurs we call typewriters).

Use real quotation marks and apostrophes (Preferences>Use typographers quotes); use proper punctuation with parentheses.
Use special characters (glyphs), en and em dashes (to differentiate from hyphens) where appropriate. Hyphens are used to create compound words: "First-class decisions require clear-headed thinking." or "He has a devil-may-care attitude." Use a dash [ — ] or dashes as a super-comma or set of super-commas to set off parenthetical elements, especially when those elements contain internal forms of punctuation: "All four of them—Bob, Jeffrey, Jason, and Brett—did well in college." [1]
  1. Hyphen - 
  2. en (n) dash (option + -) –
  3. em (m) dash (shift + option + -) —
Spend the time to make nice fractions and use correct accent marks (glyphs).
Use bold or italic for emphasis, never underline. Use bolds and italics sparingly.
 

AVOID THE USE OF ALL CAPS, even in headlines. It looks like you're screaming.

Kern (tighten or decrease tracking) headlines when necessary.

Never, ever use the spacebar to align text! Use Paragraph Alignment.

Regarding the indenting of paragraphs: use a one-em first line indent space on all indented paragraphs; don't indent first paragraphs. Use the Paragraph Panel and Paragraph Styles to define indents.
Leave no widows or orphans (see below).

Avoid more than two hyphenations in a row. Avoid too many hyphenations in any paragraph; check line breaks carefully.

Keep line spacing (leading) consistent.

Either indent the first line of paragraphs or add extra space between them -- but not both.

Never justify text on a short line.

Avoid combining more than three typefaces in a document. 

Let your text breathe: embrace white space; don't crowd text inside a box or up against a graphic element.

Use bullets when making a list, not hyphens.


Avoid abbreviations.

Reduce the size of punctuation marks in headlines. Avoid hyphenation in headlines at all costs.

Set the space before an italic word in italic, but not the space after.

Don't be a wimp.
-- Adapted from "The Mac is not a Typewriter," Robin Williams, 2003


Widows and Orphans


"Never leave widows and orphans bereft on the page."
— "The Mac is not a Typewriter," Robin Williams


In typesetting, widows and orphans are words or short lines at the beginning or end of a paragraph, which are left dangling at the top or bottom of a column, separated from the rest of the paragraph. There is some disagreement about the definitions of widow and orphan; what one source calls a widow the other calls an orphan. The Chicago Manual of Style uses these definitions:

Widow
  • A paragraph-ending line that falls at the beginning of the following page/column, thus separated from the remainder of the text. (See below, highlighted text.)
Orphan
  • A paragraph-opening line that appears by itself at the bottom of a page/column. 
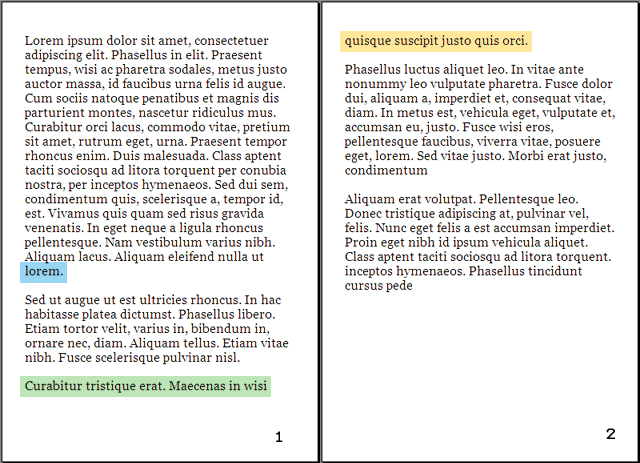
  • A word, part of a word, or very short line that appears by itself at the end of a paragraph. Orphans result in too much white space between paragraphs or at the bottom of a page. (See below, the word "lorem" at the end of page 1, paragraph 1.)

Common mnemonics (memory "hooks") are, "An orphan has no past; a widow has no future," and "An orphan is left behind, whereas a widow must go on alone." 


(1) At the end of the first paragraph on page 1, the word "lorem" is an orphan in the second sense: a very short final line that, because the rest of its line is white, creates an impression of two lines of whitespace between the paragraphs. (2) Highlighted: A widowed line, the last line of a paragraph all alone on the other side of a page break.
-- http://en.wikipedia.org/wiki/Widows_and_orphans


Don't confuse readablility with legibility

Legibility is primarily the concern of the typeface designer, to ensure that each individual character or glyph is unambiguous and distinguishable from all other characters in the font. Legibility is also in part the concern of the typographer to select a typeface with appropriate clarity of design for the intended use at the intended size. An example of a well-known design, Brush Script, contains a number of illegible letters since many of the characters can be easily misread especially if seen out of textual context. 

Readability is primarily the concern of the typographer or information designer. It is the intended result of the complete process of presentation of textual material in order to communicate meaning as unambiguously as possible. A reader should be assisted in navigating around the information with ease, by optimal inter-letter, inter-word and particularly inter-line spacing, coupled with appropriate line length and position on the page, careful editorial “chunking” and choice of the text architecture of titles, folios, and reference links.

One of the clearest distinctions between the two concepts was presented by Walter Tracy in his Letters of Credit:
"These … ‘two aspects of a type’ … are … ‘fundamental to its effectiveness. Because the common meaning of 'legible' is 'readable' there are those – even some professionally involved in typography – who think that the term 'legibility' is all that is needed in any discussion on the effectiveness of types. But legibility and readability are separate, though connected aspects of type. Properly understood … the two terms can help to describe the character and function of type more precisely than legibility alone. … In typography we need to draw the definition … of legibility …to mean the quality of being decipherable and recognisable – so that we can say, for example, that the lowercase h in a particular old style italic is not legible in small sizes because its in-turned leg makes it look like the letter b; or a figure 3 in a classified advertisement is too similar to the 8. … In display sizes, legibility ceases to be a serious matter; a character that causes uncertainty at 8 point size is plain enough at 24 point."


[1] grammar.ccc.commnet.edu